
A little diversion from quilting and appliqué, here is my pattern link from Ravelry.


")
by Deborah Kemball
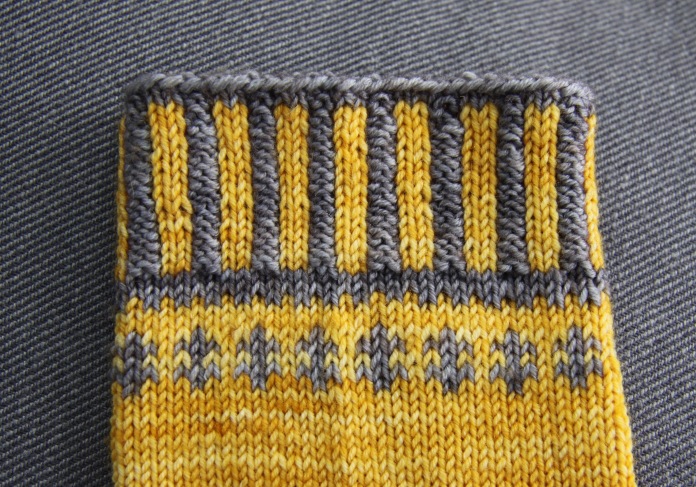
The use of two colours and simple design combine to make a high impact statement for your feet! The socks are knit with a two colour rib cuff and in stocking stitch with a simple fairisle motif.
I chose to knit these socks using 2.25 mm DPNs US Size 1. you could size up to 2.5 mm successfully depending on yarn used.
I used most of 1 skein Belle (354 m/387 yards) by Artfil in colour Anise for the main colour A and approximately 30 m of contrast colour in “Belle” in colour Mushroom colour B.
I used a standard 64 stitches cuff down sock pattern (Ladies Medium size) but the fairisle design, worked over four stitches, adapts perfectly to 60 stitches (Ladies Small), 68 (Ladies large/Men Small size ) and 72 stitches (Men large) socks. Instructions are given for 64 stitch sock.
Cast on 64 stitches in contrast colour in the cast on method of choice. I like to hold two 2.25 mm needles together to cast on over two needles to give a nice loose cast on edge. When your 64 stitches are cast on, just slide the extra needle out before dividing 64 stitches between your four needles (16 stitches per needle). Join in the round taking care not to twist. I like to knit the last four stitches of the round onto the first needle so that should I need to use a stitch marker, it will not be between needles. I then alter the stitches between the needles for 16 stitches per needle. If you feel insecure without it, place a stitch marker to mark the beginning of round.
At the end of round one join in main colour (with a nice long tail for sewing in later) and work 2:2 rib. Knit 2 in main colour, purl 2 in contrast colour, k2 main colour, purl 2 contrast etc. Make sure you always loosely loop the unused colour at the back of the work and don’t pull tightly when changing colour. Knit 15 rounds.
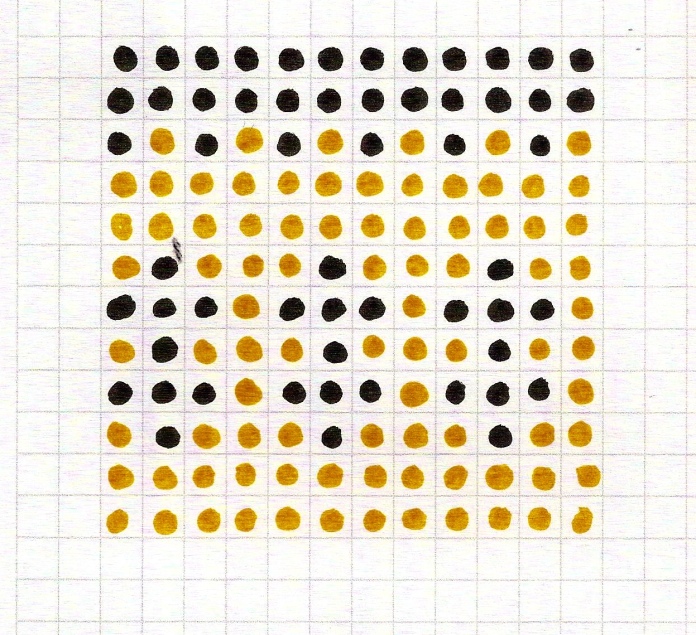
Once ribbing is complete follow chart below from top down. Pattern is is worked over a four stitch repeat. Carry colour not in use loosely at back of work
Once chart is completed continue in Main colour A for length desired to top of heel flap – usually between 6 – 8 inches.
Heel Flap
Work back and forth across 32 stitches on needles 1 and 4.
Row 1 Sl 1 knitwise, K1, *sl 1 purlwise with yarn in back, K1 repeat from * to end of row Row 2 Sl1 purlwise with yarn in front and purl to end of row.
Repeat rows 1 and 2 fifteen more times, 32 rows completed.
Turn heel
Row 1 Sl1 purlwise, k 17, K2tog through back loop, K1 turn Row 2 Sl1 purlwise, purl 5, p2 tog, p1, turn
Row 3: Sl1 purlwise, K6 K2tog tbl, K1 Turn
Row 4: Sl1 purlwise, p 7, p2tog, p1 turn
Continue working in this way until 18 stitches remain ending with a wrong side row.
Shape Gusset
Slip first stitch, knit across stitches of heel and then pick up and knit 16 stitches along the selvedge stitches along the side of the heel flap, knit across the 32 stitches at top of foot (needles 2 and 3) and then with fourth needle pick up and knit 16 stitches along selvedge of heel and knit 9 stitches from needle 1. Your beginning of the round is now the centre of the heel.
Knit 1 round
Begin gusset decreases as follows
Row 1, knit to last 2 stitches of needle 1, knit two stitches together, knit across needles two and three and then at beginning of needle 4 SSK, knit to end of round.
Row 2 Knit
Repeat these two rows until there are 16 stitches remaining on each needle 1 and 4.
Foot
Work in the round until foot measure desired length minus 2.5 inches less than the foot length. 1 1/2” is for the toe shaping and 1” is for the fairisle design.
Work the chart below from bottom up.
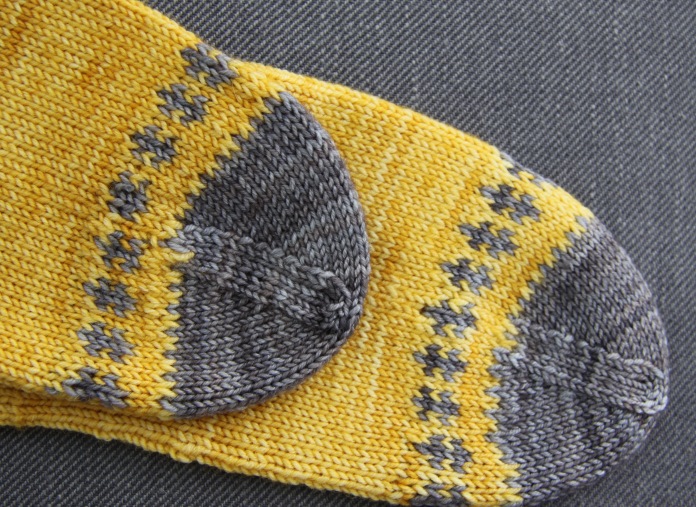
Break thread of main colour leaving a tail to sew in later and continue to work the toe in contrast colour.
Round 1 Needle 1 – knit to last three stitches, K2tog, K1: Needle 2 – K1 SSK , knit to end: Needle 3 – knit to last 3 stitches, k2tog, k1: Needle 4 – K1, SSK, knit to end.
Round 2 Knit
Repeat these two rounds until only 32 stitches remain, (8 on each needle) and then repeat round one until 16 stitches remain (4 stitches on each needle).
With needle 4 knit the four stitches from needle 1 (8 stitches) and slip stitches from needle three onto needle two (8 stitches). With eight stitches on both needles hold parallel and graft stitches using Kitchener stitch.
Weave in yarn ends and block.

When getting to the toe, wouldn’t the fairisle design be worked from the bottom up so there wouldn’t be a grey stripe before the little fleur de lis?
Yes! Thank you. I placed the color chart for the toe upside down. I will edit the wording instead. Thank uou so much for spotting the error!
Dear Debby, Thank you for this very nice pattern that I will certainly try one day. Best regards, amitiés Louise
When reading a chart top down, does one begin on the right side of graph and work left as would be done for reading a chart bottom up? These are darling socks! Thanks.
Actually it won’t make any difference if you work right to left or left to right but I always go from left to right! Thank you for writing!
Top down socks are anathema to me, but I might have a go at these toe up! I do love that colour scheme.
Thanks Al… Toe up sounds good too
I’ll let you know what mods I make so you can add it to the pattern. Could this be what gets me back to sock knitting?
Thank you for the wonderful pattern.
These are so beautiful!:) I just found them on pinterest. I’ll cast on a pair in a few days, they seem easy enough for me :))
I’m casting on for these tonight. Thank you for sharing your beautiful pattern
I have made about 50 pairs of self-patterning socks and was looking for a change. These are fab! Thank you so much for sharing pattern.
Thank you! (Me too with self patterning!). These are almost as easy just make sure you keep ribbing and fairisle colouwork loose ie don’t pull yarn tight across the back. I have made three pairs and love them!
Thanks for the tip Deborah and greetings from Pembrokeshire, West Wales where the sun is shining x
Thank you for sharing your lovely design!
Pingback: Knitting project and inspiration – The Scatterbrain Studio