As promised here is my pattern for my favourite mitts/wrist warmers. I am offering this as a free pattern. Next blog will be a brand new applique design and pattern!
Wild Rose Mitts

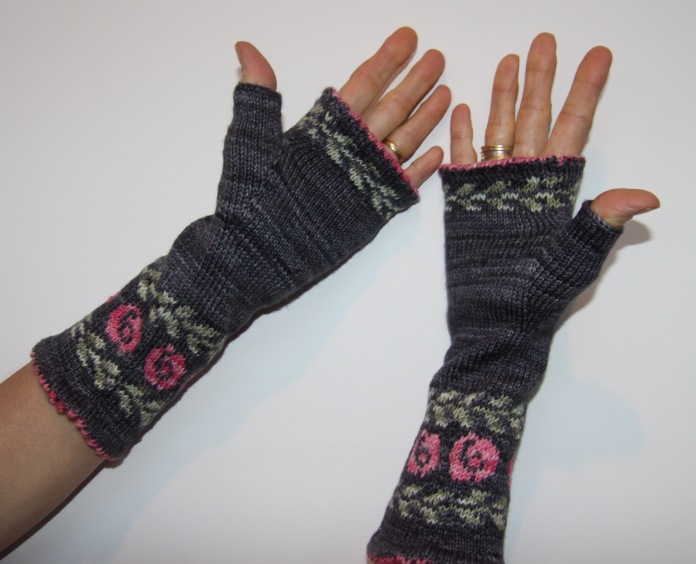
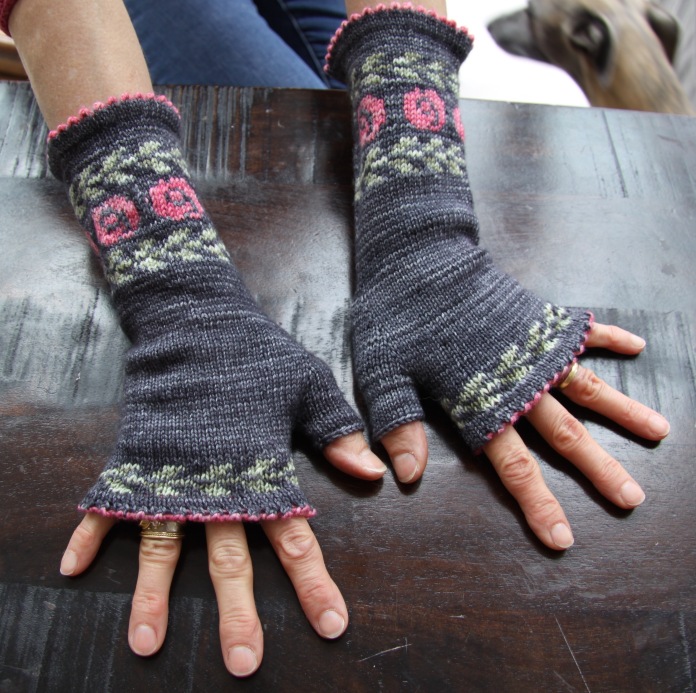
I really love these mitts. The design, the shape, the picot edge and the gorgeous Scandinavian motifs all work together to make the perfect elegant and practical mitt. One size, medium, seems to fit all.
Easy to make too I have tweaked the pattern hither and thither for the past two years and now feel confident to share it the pattern with you all on Ravelry. I have written the pattern in a way I hope even beginner knitters can easily understand.
I like to use a sock weight yarn and four 2.25mm DPNS although of course the magic loop method can be used too. These slate grey mitts are made from Artfil’s Belle in colours Slate, Strawberries and Cream and Pistachio. The colour work offers a great way to use up scraps and the main colour uses approximately 200 yards for both mitts. I tend to knit quite tightly and my tension works out at 8 stitches/12 rows to the inch. You may want to go down a needle size to get the same tension for an identical size to mine.
The charting for the traditional Swedish design is taken from Mary Jane Mucklestone’s “150 Scandinavian Motifs”.
The picot edge is a favourite of mine – I cannot resist the prettiness of it. You can make this picot edge a number of ways and I have experimented with all. I think the quickest and easiest way is to sew the picot edge in place after knitting. Not difficult to do the slant of the sewn stitches is undeniably attractive.

If you knit the picot edge down as you go the inner edge will look like this….

Cast on 64 stitches in contrast colour (I like to use the same colour as the rose). Leave a nice long tail with which to sew down the edge later (about 30 cm). I like to cast on over two needles for a loose and easily identifiable cast on edge stitch for either sewing down the edge or knitting in place later. Divide the stitches over your three needles and being careful not to twist stitches join in the round. Place stitch marker to identify beginning of round.
Work 5 rows.
Row 6: *YON K2tog* repeat to end of row
For reference to YON, (yarn over needle), also the same as wyif, (with yarn in front) and YRN (yarn round needle) see:
Row 7: Change to main colour and knit 5 rows. If you choose to knit your picot edge in place do this on the fifth row of main colour, i.e. row 11. To do this identify the first stitch of cast on edge and knit together with first stitch of row 12, continue with all subsequent stitches ie. second stitch of cast on edge with second stitch of row 12. Remember the sewn down edge is just as lovely if you can’t face doing this!
Row 12: Decrease to 60 stitches. The easiest way to do this is to knit every 15/16th stitch together
Work 5 rows.
Start working from colour work chart at beginning of row 6. Start at the arrow and work according to the chart. NB The roses are separated by three stitches across the mitt except for two which will be separated by two stitches. Make sure you carry yarn not in use loosely across the reverse of mitt.
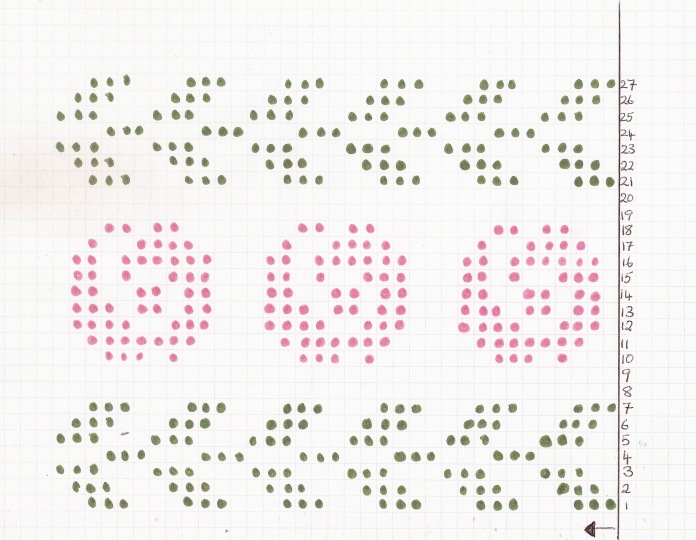
Work all 27 rows.

I find that the mitt fits better and has a smoother fit if I decrease to 54 stitches after the colourwork. I think this is because no matter how careful I am the colour work is at a tighter tension and so by decreasing 6 stitches on the row after the colour work I have a better looking mitt. However I also have very slim wrists and if your wrists and hands are on the large side you could omit this step and stick at 60 stitches.
To decrease to 54 stitches knit every 9th and 10th stitch together.
Work 10 – 20 rows up to thumb depending on how long you want the mitt to be. 10 rows will give you more of a glove, 20 more of a wrist warmer.
On this last row before working the thumb place another stitch marker one stitch before beginning of row marker.
Repeat the three following rows until you have 17 stitches between your two stitch markers. For the smoothest thumb increases I find the best way to increase is to use Make 1 Right and Make 1 Left. If you are unsure how to do this it is illustrated perfectly by Purl Soho.
http://www.purlsoho.com/create/2013/08/13/make-one-right-m1r-make-one-left-m1l/
Row 1. Starting at beginning of row, knit to first stitch marker Slip stitch marker M1R, k1, M1L slip stitch marker
Row 2 Knit
Row 3 Knit
Row 4 will be as row 1 except you will now have Slip stitch marker M1R, k3, M1L
Increase between the stitch markers until you have 17 stitches finishing with a Row 3
On next round remove the stitch marker (not the beginning of round marker), slip the 17 stitches onto a long piece of thread and then casting on one stitch over the thumb slip marker and continue working in the round.
NB It is much easier to work the mitt (and try it on) if you put the thumb stitches on a thread rather than a rigid stitch holder.
Work 6 rows
Work 7 rows of the leaf pattern from the chart.
Work four rows, change to colour contrast and work one row in *YON K2 tog* for picot edge as before.
Knit five rows
Bind off. I find the best cast off method for this bind off edge and the thumb bind off is as follows.
Knit one stitch, place knit stitch back on left needle, k2stitches together through back of loops, place this knit stitch on left needle, knit 2 together through back of loop etc. Leave a nice long thread with which to sew down the picot edge.
Thumb. Put the 17 stitches on 2 needles and then with third needle pick up three from the bodywork of mitt at the top of the thumb for a total of 20 stitches. Divide stitches evenly between the three needles and place a stitch marker to identify the beginning of round. Work in the round for 9 rows then bind off using same method as top of glove.
Sew picot edge on inside of mitt, sew in loose ends, block and repeat for mitt 2.


")