Autumn Window Box

So many of you have liked the “Window Box” idea in my latest book that buoyed up by your enthusiasm I have designed one for this time of year and especially  to put on the table for Thanksgiving  (which is this Monday in Canada).

Inspired by all the pink hydrangeas that abound in my neighbourhood at this time of year,  all growing a darker deep fuchsia pink by the day, the spiders busily their casting webs and the acorns underfoot on my  daily walk  I came up with this…..


img_6584


I used cardboard inside and so it can easily be bent to stand alone or you could prop it up against a window as its name implies.

img_3056

If you would like a free copy of this design please e mail me (deborahkemball@gmail.com) and I will send you the PDF.  You will need a copy of my book “Euphoria Tapestry Quilts” for Window Box construction and/or “Beautiful Botanicals for my appliqué and embroidery techniques but if you are well versed in my appliqué you won’t find this difficult.  The spider is new to my repertoire but is constructed similarly to the butterflies in “Euphoria Tapestry Quilts”.  It measures 36″ x 8.75″


Standard

Remembrance Poppy Brooch

A knitting blog today but a quilting blog to follow soon!  Some of you do both and it seems timely to start thinking about knitting a Remembrance Poppy.  I have just written this pattern which is perfect for a poppy but is also lovely for other flowers.  img_3358


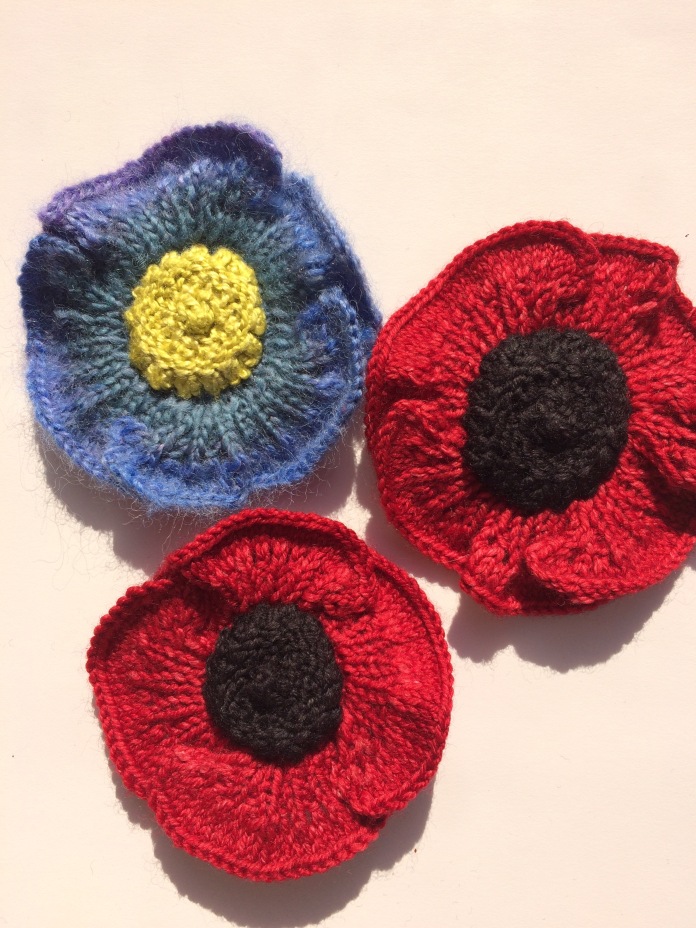
When I was in the UK last November I was stopped in my tracks by the number of original poppies I saw pinned to people’s coats. So many variations – in a wide variety of yarns and fabrics. There were felted, knitted, sewn, crotchet versions, all immediately identifiable as a poppy worn to commemorate those who died in war. Already trying to recycle my plastic poppy from year to year (if not lost to poor pinning) this seemed such a good idea to make a donation but wear a unique poppy. I resolved to make my own this year and promised a few friends that I would make them one too. A quick search on Ravelry revealed quite a few patterns and I was most drawn to Art Yarn’s version.

http://www.ravelry.com/patterns/library/remembrance-poppy-to-knit

With the right yarn in my stash I made the “Knitted Remembrance Poppy”. I am not going to lie – at first I found the centre with all of its bobbles and whatnot knit in black in poor light almost too impossible and it took three attempts to get it right. The double frill flower petals were easier but still fiddly. I like the result but it doesn’t sum up the simple beauty of a remembrance poppy to me so I have considerably adapted their pattern and added a few tips to make it easier to make. Here is my own pattern but with a big shout out to Art Yarn’s Poppy for their original.

You will need 5 double pointed needles. I like 2.25 mm best with sock yarn. This is made with Ravelry Red Malabrigo sock yarn and Artifil’s onyx Belle. You could of course use any yarn or gauge needles suitable for your chosen yarn. I think this would look great in cotton too. This project takes between 2 – 3 hours to complete beginning to end.

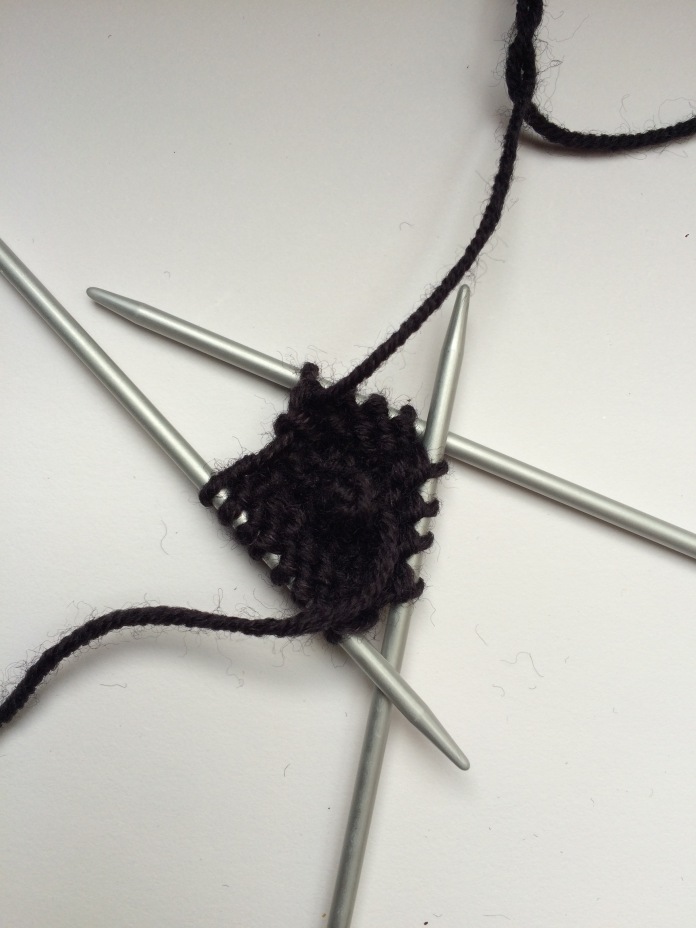
We’ll start with the centre which is the harder part of the flower. Don’t be put off by the first five rows which are very fiddly but it gets easier quickly. Instead of the bobbles I have tried to give the centre my signature picot edge which works rather well I think. The result has the look of an old fashioned button and it occurred to me that with a circle of plastic inside before drawing up the thread on the reverser this would make the most amazing button for a handknit. It’s also easier to knit if you have the really short little DPNs. I wouldn’t buy them especially but I had some in my needle bag and found them easier to work with.

kfb = knit into front and back of stitch
YO = Yarn over (the same thing as YRN = yarn round needle)
K2tog = knit two stitches together
k2togtbl = knit two stitches together through back of loop
p2togtbl = purl through back of loop

POPPY CENTER
Cast on 4 stitches and work the first three rows as an i-cord – i e knit across stitches, don’t turn the needle but slide stitches back to the other end and knit again drawing yarn taught across the back as you do – i.e. you are knitting a tube.

Row 1 Knit
Row 2 Knit
Row 3 (Now called round 3) kfb into all four stitches and distribute over three needles as you do so. TIP In order to know where the round starts I like to kfb into two stitches on the first needle and kfb into one stitch for needles 2 and 3. I find that by having a larger number of stitches on needle 1 I always know where the round starts. (8 stitches) Continue by working in the round.

img_3345
Round 4 Knit (making sure your stitches aren’t twisted from one needle to the other)

Round 5. kfb into all stitches again (this means you will have 8 stitches on needle one and four each on needles 2 and 3) (16 stitches)

img_3346

Rounds 6 and 7 purl
Round 8 kfb all stitches (32 stitches)
Round 9 knit

img_3347

 
Round 10 (YO K2Tog) for whole round
Rounds 11 and 12 knit
Round 13 (k2 tog) 16 times
Round 14 (k2 tog) 8 times

Draw thread through remaining 8 stitches. Gather them up on reverse and press into shape.

img_3348
To finish off with a darning needle take the cast on tail through to the back of the flower, and tie it with the thread gathering the 8 stitches into the round.

POPPY PETALS

Cast on 4 stitches and work as an i-cord as poppy centre

Row 1 Knit
Row 2 kfb all stitches distributing on needles as before, i.e. there will be four stitches on needle 1, two on needle 2 and two on needle 3
Round 3 knit
Round 4 kfb all stitches (16 stitches)
Round 5 knit
Round 6 kfb all stitches (32 stitches)
Round 7 and 8 Knit
Round 9 kfb all stitches (64 stitches)

img_3349
Rounds 11 and 12 k1p1 rib
Now distribute your stitches evenly over four needles, i.e. 16 stitches on each needle


img_3351

Rounds 13 continue in k1p1 rib but kfb in first and last stitch on each needle. Make sure you keep ribbing correct.
Round 14 as round 13 You will now have 20 stitches on each needle and will work each needle (petal) separately.

Petal 1

Row 1 *(k1,yo) 19 times, K1 Turn
Row 2 p39 Turn
Row 3 k2togtbl, k to last 2 stitches k2 tog turn (37 stitches)
Row 4 p2 tog, p33, p2togtbl turn (35 stitches)
cast off remaining 35 stitches.

img_3355
Rejoin yarn and work remaining three petals.
When you cast off the last petal you will be left with a curly mess like this…..

img_3361

Press it into shape with a steam iron….Sew in all the loose ends and press again.

img_3357
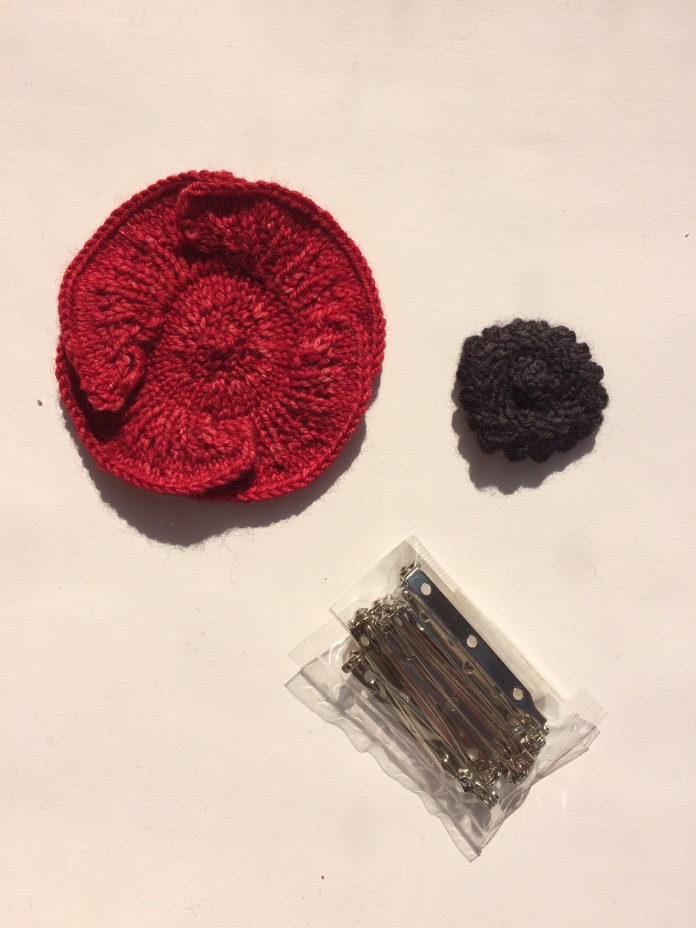
Sew centre to flower. I use a fine sewing cotton and make sure that I sew each point of the picot edge to the flower for maximum impact. Sew a brooch bar onto the reverse. (For those in Canada I chose the 45 mm bar from http://www.crystalbeadshop.com (2$ for 10))

img_3362

Standard

Thank you!

A quick blog to share some photos as requested from my Open Day on sunday.  It was such a super day, such a pleasure to see you all.  It was a bit of a step into the unknown for me, to open up the house to anyone.  I spent last week organizing all the quilts for display and then the icing on the cake was Chris Wickert’s arrival on Saturday night, brandishing champagne and a truckload of exquisite quilts.  We had such a lovely time, quilts galore, lots of visitors (we estimate over 110 people).  Thank you to Gus who manned the sales.  He sold lots of books and the Euphoria Tote Bag just walked out of the front door (over 50 of them!).  A very special thank you to Benj for holding the fort in every other way whilst I was so preoccupied, to Ann Silverthorne for her amazing help, to Chris for driving over five hours and back to be with me and to all of you for tremendous support.   Here are a few photos to give you the general idea.  We had five rooms full of quilts and projects – here are photos just two of them.

img_0812

img_6573img_6572img_0813

Standard

Open Day This Sunday!


I have spent the week getting everything ready for Sunday’s Open Day and have the house ready with a substantial exhibition of all my work over the past decade.  There is appliqué everywhere – on the walls, on the floors, on the sofas, on the tables.  I have never put all my work out in one exhibition before and even I am willing to concede the I have been pretty prolific over the past 15 years!  And all the quilts haven’t even arrived yet – I am thrilled to pieces that Christine Wickert is bringing her incredible “My Version of a Persian” to my Open Day.  Based on the flowers found in my Twilight Garden Quilts pattern pack Christine designed this absolute beauty in silk which won major awards in the USA during its exhibition life..  I am especially thrilled because I have never seen it in person.

I have been busy baking too and I anticipate a day welcoming so many of you, such friends from the quilting and knitting world into our home.  Please don’t be shy!  Please come!  We would love to see you and you will be among friends.

Sunday 18th September Open Day

20684 Rue Lakeshore, Baie D’Urfe.  11 am – 5 pm

Free Parking available on nearby streets, at the Baie D’Urfe Yacht club and Baie D’Urfe Curling Rink.  Bus route – 211 and 405 stops within 5 mins walk of the house


(Here’s a sneak peak of “My Version of a Persian” by Christine Wickert.  What a beauty!  ooh I can’t wait to see it on Sunday!)


image

Standard

Pia Sleeveless Vest

Knitting blog this time!  Here is my Pia vest pattern.  At the moment it is just written in sizes small and medium.  As soon as I have helped one of my larger friends to make it up I will be able to post instructions for the large size too.


Pia Sleeveless Vest

Design by Deborah Kemball copyright 2016


FullSizeRender


It’s the simplicity of the shape which appeals to me and makes it a modern and fresh take on the sleeveless tank top of yore. It uses the same needle size throughout (3.75 mm) and the same stitch too (stocking stitch). The picot edge is the only decoration. I feel this could be made more of a feature with a contrast colour on the underside and for the first row after the picot row.

I made the vest especially to take advantage of Yana’s hand painted beauty in Artfil’s Mericana merino DK. The simple shape shows off the yarn to its best advantage. It is worked in the round to the armholes and then the back and front are worked separately until being joined at the shoulder on the reverse with three needle cast off.


I like to wear my round necks quite high so the smaller version has a neckline like the one I am modelling above. The medium size has a slightly lower neck. I have written this pattern in my slightly chatty way instead of traditional instructions but I hope they are still easy to follow!

FullSizeRender-1


Knitting Gauge: 24 stitches and 32 rows for 4” or10 cm square with 3.75 mm needles

Requirements: 3 skeins Artfil Mericana DK Merino for size small, 4 skeins for medium. Stitch markers
Circular needles for body and shorter length circular needles for neckline and sleeve cuffs. (I use the interchangeable cord and needle system)

First size is for size small (32” bust) as modelled by me above and second is for size medium ( 36” bust).

Side by side you can see the difference:

FullSizeRender


Measurements:

Small Length 21”, Armhole 6”, neck drop 2”, chest 32”

Medium Length 23”, Armhole 7”, neck drop 2 1/2”, chest 36”

In the following instructions small size is first/ then medium size

Cast on 190/210 stitches with 3.75 mm needles – when casting on use two needles together for large stitch. I use a DPN sock needle along with the 3.75 mm needle. This gives a larger cast on stitch which makes it easier to pick up when you either knit or sew down the edge.


IMG_3120

Here is the lovely loose cast on stitch once the second needle is removed:

IMG_3124

Place beginning of round marker and join in the round taking care not to twist. (TIP – you can always knit backwards and forwards for a few rows before joining in the round to be absolutely sure that you haven’t twisted the round.

Knit 7 rows
YO K2tog to end of round

(NB YO – Yarn over is sometimes written YRN – yarn round needle. They are the same)

For the row count from the next row is now Row 1
Knit 8 rows.

Row 9: Knit the round picking up correlating cast on edge stitches and knitting them together with the stitches of row 9. This is easy if you make sure your first knit stitch is joined with the first cast on stitch. I find it easier to place the cast on edge stitches on a straight DPN needle in a smaller gauge as I go, about 20 cast on stitches at a time. If you find this onerous you can always sew the cat on edge down later.


As you can see here both versions look pretty neat. The first photo shows reverse of vest when the edge is knit together on row 9, the second when it is sewn down after completion.

IMG_3229

IMG_3231


Divide the round in half with second stitch marker for 95/105 stitches (front) and 95/105 (back) Knit in the round until you want to start shaping – i.e. – if you want to adjust the length this is where to do it. I start the shaping on row 36 for small, 44 for medium.

On Rows 36/44, 48/56 and 60/68 you will decrease 4 stitches across the round (ie every 12th row) . I like the shaping stitches to be about 6 stitches from either side of the side marker.

ie After beginning of round marker knit 6 stitches then ssk. Knit to 8 stitches before next marker K2tog then knit 6 stitches before marker, slip marker and repeat on the back.

After row 60/68 is completed knit 30/32 rows straight
Now we are going to increase four stitches across the round every ten rows. I use M1R and M1L to do this.

From beginning of round marker knit 6 stitches M1R knit to 7th stitch before side marker M1L knit to marker. Repeat on other side. Knit this increase down on rows 90/100,100/110 and 110/120 i.e. every ten rows

Divide for front and back on Row 116/130
On row 116/130 starting 6/7 stitches before the beginning of the round marker cast off 12/14 stitches. Work to 6/7 stitches before next marker and cast off 12 (14) stitches.

Work back first.

Back 83/91 stitches
Cast off 2 stitches at beginning of next two rows

Then working ONLY on right side cast off 1 stitch on either end of the row like this. Knit 1 SSK knit to three stitches before end of row K2Tog Knit1
Repeat this on every right side row a total of four times
Work three rows and then work decrease once more on the fourth row

This leaves 69/77 stitches
Work straight for 38/42 rows before shaping neck. Knit 17/19 Cast off central 35/39 stitches Knit 17/19


Work each side of neck separately

Decrease one stitch on neck edge every other row twice (ie four rows knit)

To do this on left shoulder on right side knit 1 SSK knit to end every other row twice. When working on right shoulder knit to three stitches before neck, K2tog knit 1 on right side every other row.

Knit one row, break yarn and keep remaining 15/17 stitches on stitch holder.

Front
83/91 stitches
Rejoin thread and work front as back up to the armholes. Armhole shaping is same as front.

Round neck is worked over 20 rows for small size, 25 rows for medium. This means for the small size start neck shaping on 23rd row from the end of armhole shaping and for medium size start shaping 18 rows from armhole shaping.

Knit 24/26 stitches, cast off 21/25 using stretchy cast off, knit 24/26 stitches.

Working on one side at a time cast off two stitches at neck edge twice then 1 stitch every other row until 15/17 shoulder stitches remain. Work to match back in row count i.e. about 4 straight rows before joining shoulder for small size and 11 rows for medium. Make sure front and back match exactly in row count.

When front shoulders are completed either keep stitches on your long circular needle (which is what I do) or transfer to smaller DPNs. Turn the vest inside out and join the shoulder together on the reverse using three needle cast off. Although it is the reverse, i.e. purl side, I use a knit stitch to cast off. Tip: If you work towards the neckline the loose threads will be easier to sew in.

Armholes:

This is how I pick up edges for the neatest look. I use a much smaller and sharper circular needle to pick up and I pick up every single edge stitch starting in middle of the bottom of the armhole. When I have completed picking up the round I place a beginning of round marker on my short cord 3.75 mm circular needle and knit the stitches from the smaller needle and knitting every 4th and 5th picked up stitch together. Work 4 more rows in stocking stitch and then cast off with a stretch cast off.

NB I do not give an exact stitch count but if you follow my instructions you will be fine!

To do stretch cast off: knit first stitch then place knit stitch back on left needle, knit two stitches together through back of loops, place knit stitch back on left needle, knit two stitches together through back loops and repeat until you have cast off the whole edge.

Stretchy cast off gives a lovely edge to the armhole:

IMG_3233

For the neckline I start at the back of the left shoulder and pick up the stitches in the round with a smaller needle but when knitting onto the 3.75mm needles I knit every stitch around the neck except for the across the back of the neck when I knit the 7th and 8th stitches together.

NB I do not give an exact stitch count but if you follow my instructions you will be fine!

Knit 4 or 5 more rows in stocking stitch depending on how deep you want the neck edge to be and cast off in stretch cast off as before.

IMG_3234


Sew in ends.

Sew in ends and block (or iron with a hot steam iron which is how I do it!)


Standard

Open Day Sunday 18th September

On Sunday 18th September 11 am – 6 pm I will be holding an open day at my house. It will be an opportunity to see all the projects from my new book “Euphoria Tapestry quilts”,  ask any questions about my work, appliqué and quilting.  I will also have signed copies of my books available for purchase.   In addition to my own work I am thrilled that my friend and multi award winning quilter Christine Wickert is coming up from the US especially to celebrate my new book with me and I know she will be more than happy to show some of her fabulous work and answer your questions about her work.   It promises to be a really great day  with lots of textile artwork on show, some food and wine and the opportunity to meet with lots of quilters and textile artists.  I’m so looking forward to meeting with everyone.  Please do invite interested friends too!  I’m reluctant to put my address up on Facebook so please e mail me at

deborahkemball@gmail.com

if you would like to come for my address and contact details.  It would be great if you could let me know if you plan to come (even if at the last minute you don’t!) so I have a rough idea of numbers before the day.

THANK YOU so much for all the lovely e mails you have sent me about the book.  I am thrilled with its reception.  If you bought it off Amazon it would be brilliant for me if you could write a review.  The more reviews the better!

I am very much looking forward to meeting some of you next month.

Plaid Floral II

Standard

It’s arrived!

A thrilling day for me on Wednesday.  My one pre-sales copy of my book arrived care of my lovely postman from Canada Post.  I knew C&T had sent it to me the week before and had been waiting  with bated breath for both the book and to see if the Canada Post strike would hold off long enough for me to receive it.

I am thrilled!  If writing and producing a book is akin to having a baby I’m happy to announce that it is healthy, bouncing baby with all fingers and toes intact.  It is just beautiful.  Thank you and kudos to C&T for their amazing editorial team, their commitment to make the book exactly as I envisaged it, their beautiful photography and perfect book design.  I could not be happier.  Here are two pictures – the front and the back.  I considered a few more photos but I want you to open it and enjoy it yourselves. Watch this space for notification of when they will be available directly from me (very soon!).


IMG_2795

IMG_2810


Standard

Endless Possibilities with Euphoria Tapestry Quilts


C&T wrote a blog about my book today – if you click on the link you will see some photos of the projects in “Euphoria Tapestry Quilts”

Euphoria Tapestry Quilts is based on this beautiful quilt designed by Deborah Kemball, and you will be amazed at how many different projects you can make from it. This is the most versatile quilt pattern I’ve ever seen.  Look at the photo below and you will see how the main quilt can be divided into various-size blocks. These blocks can be used singly or in smaller groupings to make many other great projects; rectangular pillows, square pillows, window boxes, table runners, or quilts in a variety of sizes. Here’s a sampling of some of the beautiful projects. Mix and match as you choose. The possibilities are endless. Enjoy!

Source: Endless Possibilities with Euphoria Tapestry Quilts

Standard

Free Pillow Design

To celebrate the publication of my forthcoming book I have been playing with some of the new flower designs therein, and with the copious quantities of butterflies and dragonflies that flitter all over the whole quilt “Euphoria”.  I have promised my quilt group a demonstration of some of my new techniques on Monday and designed this pillow to illustrate them.  In particular I have a new nifty way to sew my insects which is really well illustrated in “Euphoria Tapestry Quilts”, step-by-step style both in line drawings and photographs.

As usual I made the design up as I went along and upon completion I felt the pink dragonfly was a bit too close for comfort to the blue flower.  I drew the design out after completion of the appliqué so this space glitch is remedied in the pattern below.

IMG_6543

I made the panel up into a simple, unquilted and unpiped pillow to sit on my chair by the lake using a combination of Oakshott cottons and silks.   It  measures 19″ x 13″ but you could enlarge the panel for your own use.  Those of you accustomed to my methods will know exactly how to cut your own templates for this design.  Step by step instructions for the constructions of the flowers and insects are all in my new book, “Euphoria Tapestry Quilts.  40 New Appliqué Motifs and 17 Flowering Projects ” by Deborah Kemball

IMG_2517


It is available for pre-order on the C&T website and will be available July 18th 2016

http://www.ctpub.com/euphoria-tapestry-quilts/

or  Amazon.com, available August 7th 2016

http://www.amazon.com/Euphoria-Tapestry-Quilts-Appliqué-Flowering/dp/1617451568?ie=UTF8&keywords=Deborah%20Kemball&qid=1464455349&ref_=sr_1_1&sr=8-1

Here is the design for your personal use.  You need to print it at 200% for its full size.  The design doesn’t have a “right way up” per se, looking equally good with the large pink rose top left or bottom right.  It’s just occurred to me that this would make rather a lovely hooked rug too.  I hope someone makes it up as such and sends me a picture!

SCAN1317


Standard

Sneak Peak

A sneak peak of a project from my new book “Euphoria Tapestry Quilts” which will be in shops by mid July. Tudor Rose Panel 36″ x 20″. I am so thrilled with this design – it works beautifully both vertically or horizontally.


240 copy

240 copy (1)

My new designs seem to have a more contemporary feel to them than my previous work.    With its clean lines and sharp colour contrasts Tudor Rose Panel manages to avoid looking fussy.    I hope you like it as much as I do!

I will be posting a free pattern in the next few days which will share some of these flowers in advance of my new book’s publication.

Standard